These notes have not yet been updated for Mac OS X 10.4 (Tiger).
Various methods are available on Mac OS X for mounting remote filesystems. This page documents several methods by which OS X can mount Network File System (NFS) shares: from the Finder, static mount entries, or by using automount. These methods have only been tested on 10.2; earlier releases may not support what is documented below. Automounting works in 10.3, but only from a file and not NetInfo.
NFS requires that the userid (and groupid) be identical on the client and server. On Mac OS X clients, create a generic admin account, then manually create the other accounts from the command line will allow the correct server userid to be set. Another option is to use a Directory Service which synchronizes the account and share information on all the systems involved. Or, update the NetInfo database and convert the existing files to the new user and group numbers.
Other resources of note include amd(8) of the Automount Utilities for mounting filesystems, or OpenAFS for an alternative to NFS.
Finder Mounting
Mounting NFS from the Finder requires the NFS server to be configured to allow connections from non-reserved ports (1024 and above), as Mac OS X does not use a reserved source port to connect. Enabling connections from non-reserved ports varies on the NFS server in question. See also the rpc.lockd and other tips detailed in Using NFS between Linux and Panther.
Another option is on the Mac OS client to use the -P option to mount_nfs or the resvport flag to use a reserved port number, as shown in the examples below.
- FreeBSD: configure nfs_reserved_port_only.
- Linux: add the insecure option to the /etc/exports file entries for the shares in question, then restart the NFS service.
This can be set at startup in the /etc/rc.conf configuration file, and on a running system by changing the vfs.nfs.nfs_privport sysctl(8) value to 0.
# echo 'nfs_reserved_port_only="NO"' >> /etc/rc.conf
# sysctl vfs.nfs.nfs_privport=0
Using the -T to mount_nfs may be needed when connecting to FreeBSD; some NFS servers will support Transmission Control Protocol (TCP), others only User Datagram Protocol (UDP).
/share 192.0.2.0/255.255.255.0(rw,root_squash,insecure)
Other options (userid squashing and so forth) may be required, depending on the situation in question. See exports(5) for more details.
If running iptables on Linux, be sure to update the firewall configuration, /etc/services, and on RedHat based systems /etc/sysconfig/nfs with settings to bind NFS services to specified ports.
Once the NFS server allows connections from non-reserved ports, connecting from the Finder is simple.
- In the Finder, go to the Go menu, and select Connect to Server....
- In the resulting window, type in the URL-style path to the share on the NFS server, then hit return.
nfs://nfs.example.org/share/
The share should mount automatically and be made available on the desktop (or under the /Volumes directory from the command line), which works well for temporary needs. However, the share will be unmounted should the user logout, or if the system restarts. The following methods keep the mount available at all times.
Static Mount
This method mounts the NFS share at startup, but always keeps the filesystem mounted. The automounting method, below, is a better option.
NFS mount tables on Mac OS X are stored in the NetInfo database instead of files or NIS. To mount a filesystem, run the NetInfo Manager and create a subdirectory under mounts with the following key/value pairs set.
opts -P
name server.example.org:/share
type nfs
dir /nfs/server/share
Also be sure to create the target /nfs/server/share directory path where the filesystem will be mounted at. Automounting, by contrast, creates the directory (e.g. /nfs) on the fly, which simplifies administration.
Do not soft mount read/write shares; the ability to survive the server not being available is likely not worth data corruption.
The /mountpoint/servername/sharename mount syntax is recommended as it allows common directory names (say, /home) to be mounted from two different servers without conflict. This is similar to how OpenAFS lays things out under /afs.
Automounting via NetInfo
Setting up automount is more complex, but allows inactive shares to be unmounted when not in use, which can prevent an unused hard NFS mount from stalling the client should the NFS server fail. NetInfo mount maps will need to be created, and automount configured to mount the custom definitions.
- Mac OS X 10.3
- Mac OS X 10.2
- Setup /mountmaps in NetInfo.
- Run automount.
Use the NetInfo mounts directory to setup mounts.
name server:/shared/folder
dir /local/mountpoint
type nfs
opts …
On Mac OS X 10.2, automount can be configured to use NetInfo via /mountmaps definitions.
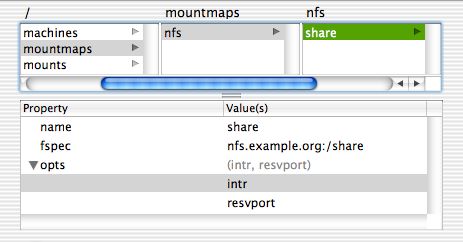
Create a mountmaps directory at the top level of the NetInfo Database, then a nfs subdirectory therein. Under there, create a new subdirectory with the following properties. Use New Value in NetInfo Manager to create multiple opts keys.
opts resvport
intr
name share
fspec nfs.example.org:/share
In the NetInfo Manager application, the setup looks something like the following.
The automount command will need to be run to mount the map in question.
# automount -m /nfs nfs
This will mount the mountmaps/nfs NetInfo mount entry (or entries) under the /nfs directory, /nfs/share in the above example. Softlinks can be created elsewhere on the filesystem to make the mount point available via a different path, if required.
Automount StartupItem
A special StartupItem will need to be setup to invoke automount on any maps created to make the shares available when the system starts up. This is required for 10.2; 10.3 systems using the /mounts NetInfo directory need no special StartupItem.
- The AUTOMOUNT entry will need to be set to -YES- in the /etc/hostconfig file.
- Mount mountmap shares at startup.
$ grep -i ^autom /etc/hostconfig
AUTOMOUNT=-YES-
To run the automount command at startup, use the following Automount StartupItem, which will invoke automount with all entries listed under the mountmaps NetInfo path. Place the Automount directory under /Library/StartupItems.
Currently, the Automount StartupItem runs automount for each subdirectory under mountmaps. In theory, a single call to automount with multiple mounts would work, and reduce the number of automount processes running. I have not had time yet to rewrite the script to do a single automount call.
Backing up /mountmaps
The nidump(8) utility creates a textual representation of NetInfo directory data, for backup or easy transfer to other systems. Use the niload(8) command to load the data back into NetInfo.
$ sudo nidump -r /mountmaps /
{
"name" = ( "mountmaps" );
CHILDREN = (
{
"name" = ( "nfs" );
CHILDREN = (
{
"name" = ( "share" );
"fspec" = ( "nfs.example.org:/share" );
"opts" = ( "intr", "resvport" );
}
)
}
)
}
Automount via File
An alternative to using NetInfo is to place the mounts into a static file, which is read by automount.
- Create /etc/auto.nfs.
- Test automount.
- Configure automount to run at startup.
This file will contain mount entries that otherwise would have been stored in NetInfo.
server-home -rw,bg,intr server.example.org:/home
$ sudo automount -m /nfs /etc/auto.nfs
$ ls /nfs/server-home
Use an @reboot root cron(8) job, or adapt the above StartupItem to call the single automount for the file in question. For more information on @reboot, see crontab(5).
Automount via LDAP
Placing the maps in LDAP might be possible. An alternative is to read the mount information from LDAP with a script, and write out the mount information to a local file.
Debugging
NFS requires a variety of services to work, and may be blocked by firewall rules or tcp_wrapper configuration on either the client or server.
- Disable (or enable logging) on any firewalls on or between the client and server.
- Check portmap allowance in tcp_wrappers (see hosts_access(5)) on client and server.
- Check that portmap is enabled and running.
- Review the system logs for permission or configuration problems.
- See what rpcinfo(8) says about open services.
- Debug the network traffic with tcpdump(1) or wireshark.
- Managing NFS and NIS, 2nd Edition.
This is only relevant if portmap has been compiled against tcp_wrappers— RedHat Linux does this, while other systems may not— and if a deny rule in /etc/hosts.deny or /etc/hosts.allow blocks access to portmap. To allow Remote Procedure Call (RPC) services, try something like the following in /etc/hosts.allow (based on the FreeBSD example hosts.allow).
portmap : 192.0.2.0/255.255.255.0 : allow
portmap : ALL : deny
On Mac OS X, portmap should be started automatically if needed.
$ grep -i rpcserver /etc/hostconfig
RPCSERVER=-AUTOMATIC-
The following shows server.example.org running both the TCP and UDP methods for NFS versions 2 and 3. NFS version 3 via TCP should be used by default if possible, though older or incompatible servers may require the use of older protocol versions or the udp method.
$ rpcinfo -p server.example.org | grep nfs
100003 2 udp 2049 nfs
100003 3 udp 2049 nfs
100003 2 tcp 2049 nfs
100003 3 tcp 2049 nfs
Utilities
Programs that configure shares and mounts on Mac OS X include:
- AutomountMaker - “a donateware, OS X native, easy tool to mount filesystems of type AFP, FTP, http, NFS, and SMB”.
- NFSManager - configures NFS on Mac OS X.
